- HOME
-
INTEGRATIONS
- pricing
- Enterprise
-
RESOURCES
- Contact Us


You’ve finished setting up ChannelReply and now have all your Amazon, eBay, Back Market, Newegg, Shopify and Walmart messages in Zendesk. That’s awesome—but now they’re just lumped in with all your other messages! What if you need to sort them out?
No sweat! It’s easy to sort ChannelReply tickets in Zendesk. All you have to do is create some custom views by following the two steps below.
Follow our instructions in “Creating and Using ChannelReply Tags” to set up a unique tag for each marketplace account.
Log in to Zendesk. Click Products (the four-squares icon in the upper right), then Admin Center.
Open the "Workspaces" menu, then click "Views.”
Click “Add view.”
Give your view a name. Then create the following conditions under “Tickets must meet all of these conditions to appear in the view”:
The first condition will make sure the view only contains New, Open, Pending, and On-Hold tickets. That way, it won’t get cluttered with tickets you’ve already solved.
The second condition will determine which messages this view shows. For example, if you use the tags of all your eBay accounts, this view will show all your eBay tickets. If you only enter the tag of your Amazon US account, it will show only your Amazon US tickets and nothing else.
Once the conditions are set, customize the other settings as much as you’d like. It's a good idea to at least get rid of any unhelpful columns. For example, we'll delete "Satisfaction," as we won't send Zendesk satisfaction surveys to Amazon customers.
Zendesk also has lots of cool options like using our custom fields in column, group by, and order by settings. That lets you sort tickets according to details like item ordered, amount paid, and much more. Learn how to set up custom fields here and how they work in views here.
Once all your settings are finished, click “Save.”
Your view is now ready! You can access it anytime from the Views list in Zendesk Support.
If you have a lot of views and don’t see the new one right away, look for “More >>.” Clicking this will reveal the rest of your views.
Following the steps above will create views for all messages delivered by ChannelReply. However, that does not always include your one-way system notifications. Keep reading if you want to organize those as well.
If you have tags set up for all your marketplace accounts, then messages delivered by ChannelReply will always have a tag. You can easily identify which messages were not delivered by us because they will not have any ChannelReply tags.
Here’s an explanation of what we do and do not deliver for each marketplace:
We deliver everything sent through your unique @channelreply email addresses. By default, this only includes your buyer messages and Amazon Answers notifications. See “How to Forward Amazon Notifications to Your Helpdesk” for more info and help configuring your settings.
Back Market does not generate email notifications. As a result, all Back Market messages you receive will be from ChannelReply and will come with your ChannelReply tag.
We offer optional tags for several types of Back Market notifications. You can enable/disable these in your Back Market settings in ChannelReply.
ChannelReply delivers buyer messages and a wide variety of optional eBay notifications. See “How to Import Notifications from eBay” for details.
Just like with Amazon, Newegg users get a unique @channelreply email for each platform they connect. Our Newegg integration instructions have you use this to set up ChannelReply delivery of customer messages only.
By default, ChannelReply does not actually deliver Shopify messages. Instead, we let you forward messages to your helpdesk with your preferred email address. ChannelReply then adds tags to, and displays data on, the messages from your Shopify store.
This is the only case where ChannelReply tags will appear on messages that ChannelReply has not actually delivered.
We will also add tags and order data on Shopify messages delivered through a ChannelReply email or through custom SMTP, of course.
The only system notifications in Shopify are “staff order notifications.” (You can find the setting in My Shopify > Settings > Notifications.) These are delivered through the recipient emails you enter. You can use your ChannelReply Email to have us deliver them, or enter any other email that delivers to Zendesk to use standard email forwarding.
With that said, we recommend having ChannelReply create Shopify New Order notifications instead. Our New Order notifications have way more features and don't count toward your message limit. They're also automatically tagged "neworder," which makes them way easier to sort into views.
Walmart works just like Amazon and Newegg. Messages and notifications sent through your ChannelReply email are delivered by ChannelReply. Everything else can be delivered by standard email forwarding.
If you only get messages and notifications through ChannelReply, then your ChannelReply tags can sort them all into views.
If you’re receiving system notifications in Zendesk that are not delivered by ChannelReply, and you'd like to get them into a certain Zendesk view, keep reading.
You can sort your notifications into views by creating Zendesk organizations. Organizations are groups of one or more email domains.

Each view has the option to show or hide tickets from any organization.
By grouping the domains used to send system notifications into Zendesk organizations, you can filter your notifications into or out of views as needed.
Each marketplace has its own system for how it generates and sends system notifications. As one example, Amazon US notifications come from addresses like the following: atoz-guarantee-no-reply@amazon.com, do-not-reply@amazon.com, and order-update@amazon.com.
What do these have in common? They all end with the domain amazon.com. So, if you’re selling on Amazon US, all your system notifications are coming from amazon.com. That means you can create an organization for the amazon.com domain and use it to assign all your Amazon US system notifications to Zendesk views.
You can apply the same system to any other marketplace. Look at the one-way notifications you receive and see which domains they come from.
Next, group these domains in the way that’s most helpful for you. If you want to treat all your eBay notifications the same way in views, for example, it’s best to put all eBay domains together in one organization. You may not want to bunch them together with Amazon and Walmart domains, though.
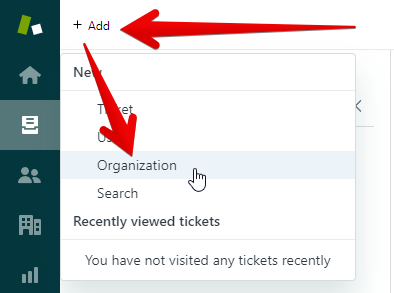
Mouse over "+ Add" in the upper left of your Zendesk screen (don't click or it will just create a new ticket). Then select "Organization."

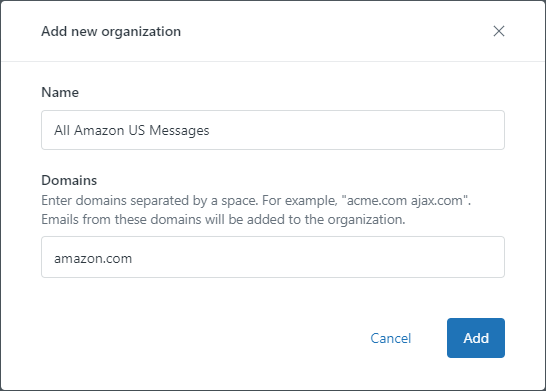
This will pop up a simple interface asking for the organization’s name and domains. Enter one of your sets of email domains and give the organization a name that’s easy to understand.
Click "Add" once you’re done. All messages from the domain(s) you’ve entered will be assigned to this organization. (It may take a few minutes for Zendesk to finish matching existing tickets and users, so don’t worry if you see zeroes at first.)
If you want to edit this organization in the future, you can find it by going to Organizations in Zendesk Support. It's the office buildings icon on the left.
Note that in Amazon’s case, buyer messages come from the same domain as one-way notifications. The example organization we just created will therefore include all Amazon messages of every kind. (But don’t worry, we’ll cover how to split notifications from buyer messages shortly.)

Finally, add the organization to the settings of any view where you’d like to see your system notifications. Under “Tickets must meet all of these conditions to appear in the view,” enter this condition:
Organization | Is | [Select the organization you just created]
If you would like to exclude messages delivered by ChannelReply from this view, just add this condition:
Tags | Contains none of the following | [Enter your ChannelReply tags]
That way, this new view will only show your system notifications that are forwarded by email. All your buyer messages will stay in the view you created earlier.
Finally, be sure to include the condition “Status | Less than | Solved” so you only see unsolved tickets.
To learn more about creating and using views in Zendesk, see their article “Creating views to manage ticket workflow.”
Our team is happy to answer all your questions on supporting Walmart, Shopify, Newegg, Back Market, eBay and Amazon from Zendesk. Contact us for assistance.


