- HOME
-
INTEGRATIONS
- pricing
- Enterprise
-
RESOURCES
- Contact Us


It’s incredibly easy to set up an autoresponder for Amazon, eBay, Walmart, Etsy, Shopify, Back Market or Newegg in Kustomer. If you have ChannelReply, then even Kustomer’s default autoreply rules will work automatically!
With that said, getting the best out of Kustomer autoresponders can take a bit of extra setup. Follow the guide below to make sure your autoreplies are delivered consistently—and, where possible, mark your messages as answered.
This autoresponder system delivers messages with a delay. Your message will appear in Kustomer right away, along with a private note showing its estimated delivery time. This could be up to 45 minutes after the autoreply appears in Kustomer.
You can safely answer your messages whenever you want. If an agent sends a response before the auto-reply is delivered to the customer, ChannelReply cancels the auto-reply. The agent’s response is delivered to the customer instantly instead.
If you follow this guide, most marketplaces will count your autoreplies toward any time limits. Amazon, eBay, Back Market and Newegg all treat these replies as human responses.
Etsy sellers: It's important to note that autoreplies do not appear in Etsy Messages and cannot be delivered in some cases.
Walmart sellers: Walmart does not count autoreplies toward their response time requirements. But, you can still use autoreplies to provide valuable info and reassurances for your customers.
Since marketplaces like eBay and Amazon often have strict rules on communication, it’s best to be careful. We recommend creating an autoresponder just for ChannelReply and using other rules for your other tickets.
If you haven’t done so already, set up ChannelReply tags for all marketplace accounts you have connected to ChannelReply.
Kustomer will only allow you to use tags in business rules if they have arrived on at least one ticket or if you have created them manually. If you just created your tags in ChannelReply, we recommend manually adding them to Kustomer now. That way, you’ll be able to complete all the steps listed below.
To create tags in Kustomer, go to “Settings” (the gear icon on the left).
Open the “WORKSPACE” dropdown and click “Tags.”
Finally, hit “+ Add Tag” in the upper right.
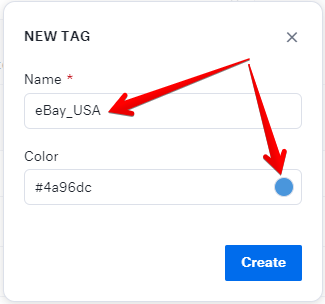
Enter the name of your tag exactly the same way you entered it in ChannelReply. If you want, you can also select a color for your tag.

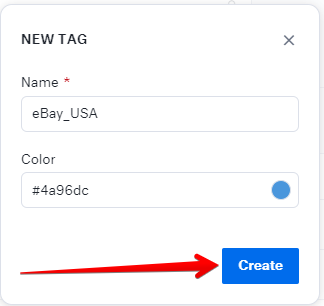
Click “Create” when you’re finished.

Once you have entered your account tags, we recommend adding the automatic tags for all marketplaces you have integrated with. See the list of automatic tags by marketplace here. For example, if you have integrated Amazon and Walmart, it’s best to create all tags from the Amazon list and the Walmart list.
Creating these tags will let you prevent auto-replies from firing on things like eBay Resolution Center cases. By excluding them from your rules, you’ll make sure your autoresponder only fires on regular customer messages.
Once your tags are all set, go to your Kustomer account. Click “Settings” (the gear icon on the left), then open the “PLATFORM” dropdown and select “Business Rules.”
See if you already have any auto-reply rules in place, like “Acknowledgement auto-reply.” If you do, click “Edit” (the pencil icon) next to any of these autoresponders.
Under “Match ALL of the following,” click “+ Add.” Enter this condition:
Conversation | Tags | Is Not One Of | (enter the ChannelReply account tags you created here; you do not have to enter any of the automatic tags for notifications)
Click “Save Changes” once you’re finished.
If you have any other active autoresponder rules, add the same condition to each of them.
To ensure your replies count toward systems like Amazon’s 24-hour SLA, we strongly recommend setting up our custom fields for Kustomer. These can automatically personalize your auto-replies. That way, they’re more helpful to the customer and never contain the exact same text.
Return to the Business Rules page (Settings > PLATFORM > Business Rules).
Click “+ Add Rule.”
Hit “+ Create From Scratch.”
Configure the new rule as follows:
Check the “Activate Business Rule” box so this rule starts working as soon as it is saved.
Give the rule an easy-to-remember name like “ChannelReply Autoresponder” or “Amazon Autoresponder.”
If you’d like this autoresponder to only reply to the first message in each ticket, change “All Updates” to “First Inbound Interaction.”
If you want it to reply to every message, choose “Inbound Interaction” instead.
Click “+ Add” under “Match ALL of the following.”
Enter the following condition:
Conversation | Channel | Is Equal To | Email
Hit “+ Add” under “Match ALL of the following” again, and then add this:
Conversation | Tags | Is One Of | (enter the ChannelReply account tags of all accounts you want this autoresponder to work with)
Finally, we recommend adding one more “ALL” condition:
Conversation | Tags | Is Not One Of | (enter all automatic tags related to all marketplaces this autoresponder will work with)
Hit “Select Action Type,” then check “Send Message.”
Click "+ Add Action."
Set Channel to Email.
Leave the Email Template as Default and choose your desired From address.
You can leave the two “Reply to…” checkboxes unchecked. Most of the time, marketplace messages only have one sender with no CCs and no other email addresses in the To field. (There may be occasional exceptions, though; for example, Shopify messages can have CCs from time to time.)
Many marketplaces, like Amazon and eBay, have systems set up to automatically mark overused autoreplies as spam. Here’s how to make sure your autoreplies go through (and even count as answers) every time:
Once all the above settings are filled in, just hit “Save Changes.”
You’ll see a success notification, and your autoresponder will leap into action on exactly the tickets you want it to!
Please feel welcome to contact us if you have any questions. Our Awesome Support Team is always happy to help!


